

MLOps 9: MLFlow Part 1
MLOps 9: MLFlow Part 1
Introduction to MLflow, MLflow tracking, MLflow projects

Only have 3 sections here, so you know it’s going to be “deep” - Whitebat
Table of Contents:
Introduction to MLflow
MLflow tracking
MLflow projects
1 - Introduction to MLflow
In the dynamic world of Machine Learning (ML) and Artificial Intelligence (AI), one of the greatest challenges isn't just developing models, but managing their entire life cycle. From conception to deployment and even post-deployment monitoring, the life of an ML model is intricate. As the saying goes, "Necessity is the mother of invention," and the world needed a solution to streamline this complexity. Enter platforms designed to manage the ML life cycle, and among the frontrunners is MLflow.
1.1 Why the need for platforms
Complexity: The ML model life cycle isn't linear. It involves iterative processes of data collection, preprocessing and model training. Also, validation, deployment, monitoring, and often retraining.
Reproducibility: The "It works on my machine" syndrome is all too common. Ensuring that a model behaves consistently across different environments (development, staging, production) is crucial.
Collaboration: Data scientists, ML engineers, developers, and business stakeholders all play a part in the ML journey. A unified platform enables smoother collaboration among these diverse teams.
Monitoring and Management: Post-deployment, models need consistent monitoring for performance decay. Moreover, businesses often running many models at the same time. So, managing them becomes an operational challenge.
1.2 Introduction to Mlflow
MLflow is an open-source platform that addresses the intricacies of the ML life cycle. It provides tools for end-to-end model development and deployment. This ensures consistency, reproducibility, and efficient collaboration. With MLflow, teams can:
Track and compare experiments.
Package ML code into reproducible runs.
Share and collaborate on these runs with teammates.
Deploy models to production, no matter where the model is trained or what libraries are used.
1.3 Installing MLflow
To harness the power of MLflow, you'll first need to set it up. Here's a straightforward guide to get started:
Prerequisites: Ensure you have Python installed on your machine.
Installation: MLflow can be installed using pip. Simply run:
pip install mlflowOnce installed, you can launch it by doing:
mlflow serverIf you prefer more of a video format, here is an excellent video that helps you get started. Regardless, once you are done, you’ll end up in a screen that looks something similar to this:

Now that you’ve gotten yourself setup with MLflow, we’ll focus on the 4 core components of it:
Tracking: Record & query experiments
Projects: Package data science code to reproduce runs on any platfoorm
Models: Deploy ML models in diverse serving environments
Registry: Store, annotate and manage models in centralized repository.

2 - MLflow tracking
As practitioners experiment with different models, hyperparameters, and features, it becomes increasingly challenging to keep track of all these variations and their outcomes. This is where MLflow Tracking comes in, it’s like a personal diary, but for all of your ML experiments.
2.1 Why we need these records
Every run in machine learning can be unique in terms of its setup: the data it was trained on, the hyperparameters used, the architecture of the model, etc. Tracking these can:
Facilitate Reproducibility: If a model performs exceptionally well, you'd want to recreate it.
Help in Iterative Improvement: By comparing different runs, you can ascertain which changes led to performance improvements.
Assist in Collaboration: If working in a team, it's crucial to share experiment details with colleagues.
2.2 What does MLflow actually store?
MLflow is akin to a meticulous researcher making notes. Here's what it keeps tabs on:
Start & End Time: How long did your experiment run? This can provide insights into the efficiency of your code and the complexity of your model.
Source: It tracks the exact script or notebook where the experiment originated. This is vital for reproducibility.
Parameters: These are the settings you chose. Did you set the learning rate to 0.01 or 0.1? MLflow remembers.
Metrics: Whether it's accuracy, precision, AUC-ROC, or any custom metric you're interested in, MLflow logs them.
Artifacts: Think of these as the tangible outputs from your experiment. It could be the trained model itself, plots that visualize performance, or any files that the run generated.
2.3 Recording your Experiments with MLflow
Capturing details of your runs is achieved through intuitive functions MLflow provides. Here are some of the most commonly used commands:
Setting the Tracking URI: This specifies where MLflow should save its logs.
mlflow.set_tracking_uri('http://127.0.0.1:5000')Getting the Current Tracking URI: If you want to verify or share the location where experiments are being tracked.
current_uri = mlflow.tracking.get_tracking_uri()Experiments: Think of them as categories or folders where related runs can be grouped.
mlflow.create_experiment("experiment_name")
mlflow.set_experiment("experiment_name")
Starting and Ending a Run: These commands encapsulate your experiment, ensuring all logs are associated with a specific run.
with mlflow.start_run():
    # Insert model training and evaluation code here
Logging Details: Inside a run, you can log various specifics. Whether it's parameters, metrics, tags, or artifacts, MLflow provides a simple interface.
mlflow.log_param("param_name", value)
mlflow.log_metric("metric_name", value)
mlflow.set_tag("tag_name", value)
mlflow.log_artifact("file_path")
2.4 Putting it all together
Let’s say you wanted to run a super simple Linear Regression model, and then store
import mlflow
from sklearn.datasets import make_regression
from sklearn.model_selection import train_test_split
from sklearn.linear_model import LinearRegression
from sklearn.metrics import mean_squared_error

# Directing MLflow to save logs locally
mlflow.set_tracking_uri('http://127.0.0.1:5000')

# Organizing this run under a named experiment
mlflow.set_experiment("linear_regression_logs")

X, y = make_regression(n_samples=1000, n_features=10, noise=0.1)
X_train, X_test, y_train, y_test = train_test_split(X, y, test_size=0.2)

with mlflow.start_run():
    model = LinearRegression()
    model.fit(X_train, y_train)
    predictions = model.predict(X_test)

    mse = mean_squared_error(y_test, predictions)

    # Logging key details
    mlflow.log_param("model_type", "Linear Regression")
    mlflow.log_metric("MSE", mse)

    # Saving and logging the model as an artifact
    mlflow.sklearn.log_model(model, "model")
Here’s a quick tldr that describes what’s going on (after doing the train test split):
The
with mlflow.start_run():block ensures that everything inside is treated as a single "run" or experiment by MLflow. Any parameters, metrics, or artifacts we log will be associated with this specific run.We then initialize and train a linear regression model. After training, we use the model to predict on our test set and calculate the mean squared error (MSE) as our evaluation metric.
The
log_paramfunction is used to log details about our experiment. Here, we’re recording that we used a linear regression model.With
log_metric, we're recording the MSE, which tells us about the performance of our model.Lastly,
log_modelsaves our trained model. This can be used later for deployment or further analysis. MLflow isn't just about numbers—it can save entire models, plots, or any other files with thelog_artifactfunction.
Once you have executed the above code, make your way to the experiments tab, and you can see all of the parameters/outputs it had recorded:

3 - MLflow projects
As data science and machine learning projects grow in complexity and scale, there's an increasing need for a more structured way to manage the entire life cycle of ML experiments. Enter MLflow Projects.
3.1 .YAML files
YAML, which stands for "YAML Ain't Markup Language", is a human-readable data serialization format. It's often used for configuration files and data exchange between languages with different data structures. In the context of MLflow, .yaml files often define the environments for projects.
Here is why we use .yaml files with mlflow:
Consistency: Ensure that every team member (or automated process) runs the project with the same dependencies and environment configuration.
Reproducibility: Minimize the "it works on my machine" syndrome. By detailing environment specifications in a
.yamlfile, you're laying down the groundwork for reproducibility.
You can learn more about YAML files here
3.2 CLI
CLI stands for Command-Line Interface. It's a way of interacting with a computer program where the user provides commands in the form of successive lines of text (command lines). Tools like MLflow offer a CLI because it allows for more flexibility in scripting, automation, and integration into various development environments.
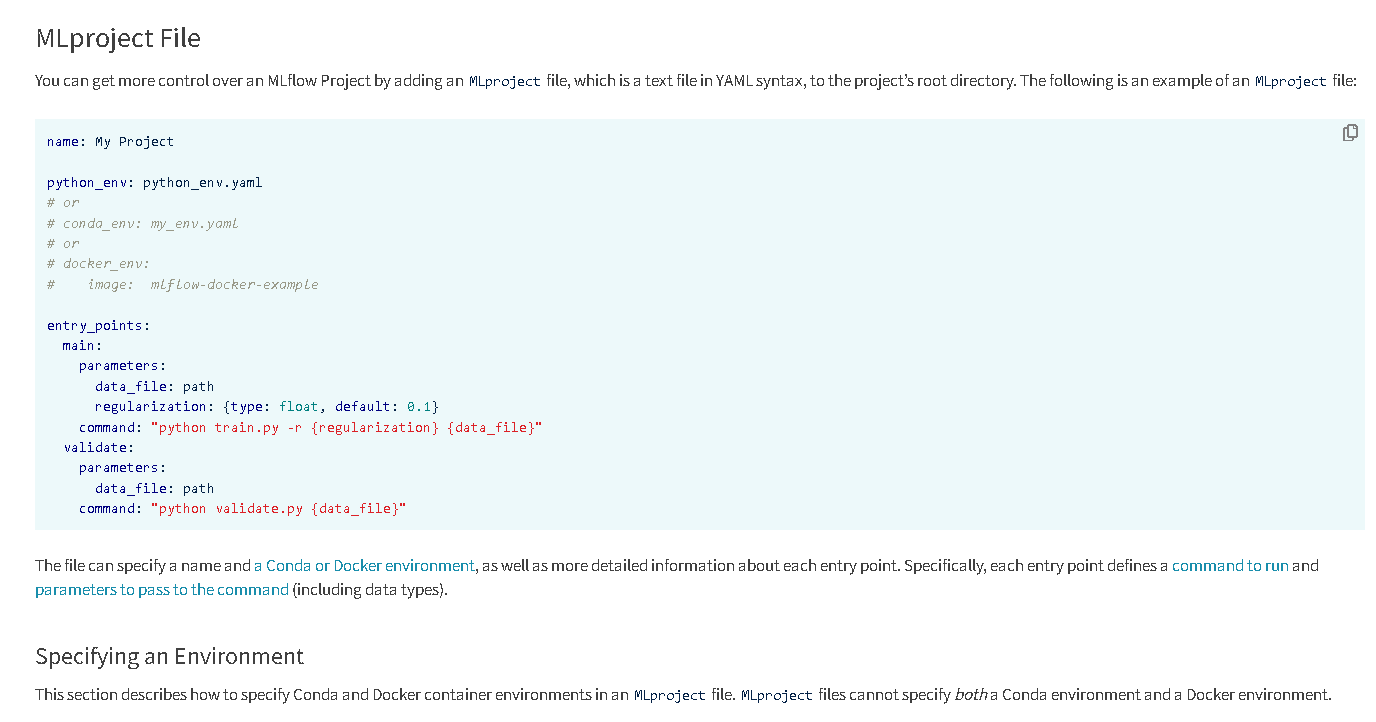
3.3 MLproject files
An MLproject file is the cornerstone of any MLflow project. It's a YAML-formatted file that defines the structure of the project and its dependencies.
Key components include:
Name: Specifies the name of the project.
Environment: Outlines the environment in which the project runs. This can be a Conda environment or a Docker container.
Entry Points: Defines the commands that can be executed for the project. Each entry point specifies a command and a set of parameters.
Parameters: Input parameters required by the entry points.
Here’s an example of what a MLproject file could look like:
name: My_ML_Project

conda_env: environment.yaml

entry_points:
  main:
    parameters:
      data_file: path
      regularization: {type: float, default: 0.1}
    command: "python train.py -d {data_file} -r {regularization}"
With MLflow's CLI, running a project that has been defined with a .yaml environment is simple:
mlflow run . -P data_file=data.csvHere, . indicates the current directory which should contain the MLproject file.
3.4 Creating & running experiments using a CLI
Creating and running new experiments with MLflow via the CLI can be done as follows:
Set an experiment:
mlflow experiments create -n "New_Experiment"Run the project under this experiment:
mlflow run . -P data_file=data.csv --experiment-name "New_Experiment"If you would like to learn more about how YAML, CLI, and MLflow are connected with each other, you can check out the official documentation from MLflow here. Here is a quick preview of what you can expect to see.
Next time, we’ll cover the Models, and the Registry side of MLflow